Jamie’s 15 Minute (5 minutes) Smokey Baked Beans

10154208_10154039054065648_6678188973282475869_n

Beans, beans, they’re good for your heart! The more you eat, the more you fart! Well, I’m not owning up to anything here, but I will tell you I love these quick baked beans! Jamie Oliver again – 15 minute meals this time – and swiped from a Cajun Steak recipe I can’t say I’ve tried yet. I think I saw these on the programme he filmed for Channel 4, and they have fast become a BBQ favourite. So quick it’s ridiculous, and uses most things you have in your cupboard – love these types of recipes. Serve them up with some salad, burgers, sausages, halloumi and sangria and have a feast!! Perfect for bank holidays!

Ingredients

2 x 400g tins of mixed beans

350g passata

2 tablespoons tomato ketchup

2 tablespoons HP brown sauce

1 heaped teaspoon English mustard

1 teaspoon tabasco

1 teaspoon Worcestershire sauce

1 teaspoon runny honey

40g grated cheddar cheese

Recipe

1. Drain and rinse the beans and start frying them for a couple of minutes on a medium heat. This will crispen the outsides up.

2. Next, add the rest of the ingredients except for the cheddar, mix well and bring to the boil.

3. Grate over the cheddar cheese and put in the oven at 200°C until golden and bubbling!

4. Serve and enjoy!

Tips

Make more! These are delicious the next day, hot or cold, so I will make extra and use as a side dish.

How to Plan A Treasure Hunt: Top Tips

Screen Shot 2014-04-23 at 22.57.20

WHAT I DID

After planning a birthday treasure hunt for James when I was going away the day of his birthday, I wanted to share how I did it! It took a LOT of planning, but I wanted to leave him with something to do while I was gone. It started in the car as he was driving me to the airport – he got to open the first clue! It directed him back home for a few clues around the flat, and then on to pick his mates up who each had a clue! The last one directed him to the main event – it ended with a big box filled with edible goodies (lots of fizzy sweets, mint Aero and flumps) and an ASDA Click & Collect order, which he had to go and collect – it was filled with beer, bacon and ham.. lots of ham. It was very food related, but that was always going to happen!

TIPS

  1. Plan, plan, and plan some more! I honestly made a table. I would have got totally mixed up with what clue was meant to go where and who got what! I wrote the order numbers on the backs of the clues and wrote where that clue was meant to be. Much easier.
  2. Use the internet!! I can’t rhyme for toffee so Rhyme Zone was a lifesaver. I also created a special QR code with this QR code generator, and reversed text so that he needed a mirror to read the clue with on this website! For the QR code, I downloaded a scanner app on his phone, clicked on plain text creator and printed it out! Easy peasy! I also created a Rebus clue (?!) which is basically pictures and letters using this site – I loved this one though! It might have been my favourite! Basically, use all the technology!!
  3. Go big or go home – Take it outside your house! In the garden, in the car, hidden locations, work, with friends, at favourite restaurants, etc., etc.! The possibilities are endless! Go far and wide!
  4. Hide your history! I used Google Chrome’s sneaky Incognito mode. Genius.
  5. Personalise it! It definitely makes it 100% better if you get some personal jokes in there, things that will make them smile and shows how much effort you’ve put in!! Include their favourite foods, favourite places and don’t just print out the first thing you find online! Not worth it.
  6. Get your Art Attack on! Go buy a Pritt-Stick (I actually didn’t have one), some card and Crayola’s and go to town! Cutting and sticking makes it all the more fun to find, and it takes you back to your primary school days!
  7. Where is it all going? What will it end with!? Don’t let it be an anticlimax! It doesn’t have to cost a bomb but make it just as exciting as the clues themselves!
  8. Photos! Film, video, photograph the whole event!! It will be so nice to look back on – I only wish I could have had it filmed so I could have seen his reactions!
IMG_8337

The prize!


Two Ingredient Healthy Pancakes!!

179927_10152813374660648_80562364_n

So I’ve been trying to be healthy lately, as all of a sudden my holiday is 6 weeks away!! And I found this recipe for two ingredient pancakes – only banana and eggs! Quickly forgot all about it until I woke up starving with not much in for breakfast, and remembered this recipe! I had lots of eggs and a banana, and some strawberries to finish off! Oh my god – amazing. Don’t taste too banana-ery (is that a word?) but just enough to be able to taste it. I added a sprinkle of mixed spice because it’s what I had in, but you can add cinnamon, nutmeg, etc. I also served it with a drizzle of honey which I decided was better that fakey ‘no sugar’ syrup – and I could eat them all over again. The best bit is that it couldn’t be more simple – I love it when it’s easy!!

Ingredients:

  • 2 eggs, whisked.
  • 1 banana, mashed.
  • Oil for the pan – I used coconut!
  • Berries for serving.

Optional Extras:

  • All natural maple syrup
  • Honey
  • Mixed spice, cinnamon, vanilla, etc.

Directions:

  • Mash the banana up with a spoon or a fork or whatever you can find!! Mash it up with no lumps.
  • Whisk the two eggs together in a bowl.
  • Then add the mashed banana, and whisk together again.
  • Put some oil on a low medium heat.
  • Using approx. 2 tablespoons per pancake, spoon them into the pan.
  • Flip them after a minute, or when the centre looks bubbly!
  • Serve them with whatever berries you have in, and a little bit of syrup/honey!

This served two hungry people for breakfast/brunch, but could stretch to three maybe!!

I dare you to try it!

REVIEW: Gorilla Manchester & The Staves

Image

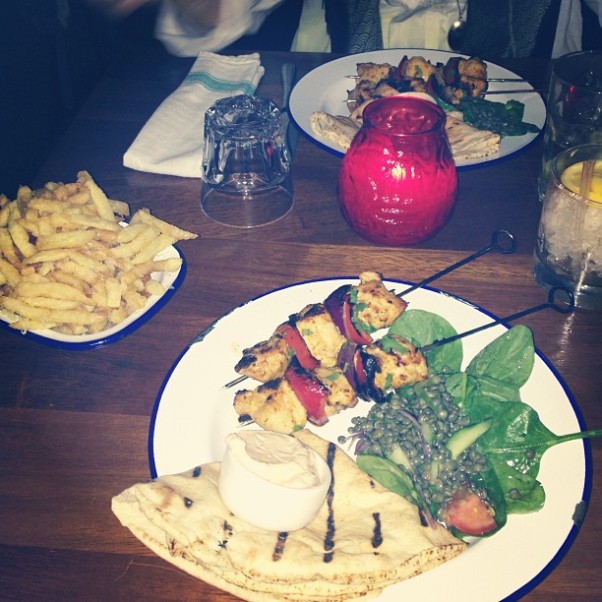
Tonight my Mum and I were off to see the lovely Staves (Spotify if you’ve never heard them, they’re perfection to your ears I promise!) who were playing in somewhere called Gorilla in Manchester. Looking on their website we saw they did food there and it looked like lovely food too, so decided to eat there.

When we got there it was chocker, but we sneakily found a jammy table after people didn’t show up (how rude!) but good for us I suppose – so thanks!! There was too much to choose from really, but the smells of the chicken from the table next to us were too much to bear, so we ordered the Chermoula Chicken Kebab and deluxe chips! I was going to get the Chargrilled Chicken but we were told it took an extra 20 minutes and we were a bit short of time, so unadventurously we both ordered the same!! Don’t care though as it was bloody marvellous. I have a real thing for chicken at the moment, but only when it’s done right (a la Gourmet Burger Kitchen – they know how it’s done!), but this place can join the list of Places That Can Do Chicken Well (a real list!). Perfect flavour and golden colour that tastes a bit of barbecue. Can’t be beaten. Along with the flatbread and puy lentil salad it was lovely.

And now the chips. Deluxe chips with truffle oil and parmesan cheese. Oh. Wow. I honestly do love chips so I am easily pleased, but these will have to be recreated. I’ll let you know how I get on, but I will dream of these chips until then.

Then we headed around the corner to see the Staves. I’m no music reviewer, but just give them a listen and you’ll understand how good they can be live. Three sisters with beautiful harmonies and a sharp sense of humour made for a perfect night. Please listen to them!

Now I’m off to dream of truffle oil and parmesan chips and listen to the Staves!

Happy Saturday!!

Image

Pea, Feta & Mint Fritters and Yoghurt Mint Dip

Image

Having finished uni this week, I can finally do all the things I never felt I had time for before!! Including these! Pea, feta & mint fritters with yoghurt mint dipping sauce from Gourmande In the Kitchen, found them the other day, and a combination of not needing the whole of ASDA to make them, and looking fairly quick and easy to do, meant they were on the list of things to make! I did them for lunch today and although they took longer than I thought to make, they were definitely worth it. Especially the little golden bits which was big hunks of melting feta – amazing!! The recipe was originally gluten free and grain free, but I wasn’t too bothered about that and changed it up a little bit to suit what I had in. I’m a big fan of mashing anything together, frying it and calling it a fritter, so I was easily pleased!! Here’s the recipe I used:

Ingredients

For the Yogurt Sauce:
  • 120 ml thick Greek or strained plain yogurt
  • 1 Tablespoon freshly squeezed lemon juice
  • 1 Tablespoon fresh mint, finely chopped
  • Pinch of sea salt
  • Freshly ground black pepper to taste
  • Extra virgin olive oil for drizzling
For the Pea Fritters:
  • 260 g fresh or thawed frozen green peas
  • 2 large eggs
  • 2 spring onions (or one medium shallot), white and light green parts thinly sliced
  • 2 Tablespoons fresh mint leaves, coarsely chopped
  • The zest from half of an unwaxed or organic lemon, finely grated
  • 56g sheep’s milk feta
  • 28 g coconut flour, sifted
  • ½ tsp sea salt
  • ¼ tsp freshly ground pepper
  • Olive oil for frying

Instructions

  1. Make the Yogurt Sauce:
  2. Whisk all ingredients in a small bowl until smooth. Season to taste with sea salt and freshly ground black pepper and drizzle with olive oil.
  3. Refrigerate until needed. (Can be made ahead of time)
  1. Make the Pea Fritters:
  2. Cook peas in a large saucepan of boiling salted water until just tender (about 3-4 minutes).
  3. Drain and mash coarsely using a fork or pulse briefly in a food processor until chunky.
  4. In a large bowl whisk together the egg, green onions or shallots, mint, lemon rind, feta, coconut flour and salt and pepper. Add in the pea mixture and mix thoroughly. Set aside for 5 minutes to allow the coconut flour to absorb some of the moisture.
  5. Heat a thin layer of coconut oil in a medium frying pan over medium heat and place heaped tablespoons of the pea mixture in the pan pressing down the mixture into a disc. Cook in batches flipping when golden on one side (about 2 minutes each side).
  6. Drain fritters on parchment paper if needed.
  7. Serve immediately with the yogurt sauce on the side and additional lemon wedges and a green salad if desired.

I don’t really like a strong flavour of mint to be honest, but followed the recipe and it wasn’t too much, but add more if you like that sort of thing!! Same with the lemon really, but I did forget to serve with the lemon wedges at the end so I’d definitely do that next time. I served these for lunch for two with a salad which was enough, but it’d need to be served with more for a bigger number of people. Perfect for a picky tea – like the Sesame Seeded Halloumi from the other day!!

Happy frittering!